The Water Damage Remediation Process

Water Damage Remediation Salt Lake City

Water damage can be caused by a variety of factors such as a burst pipe, flooding, or even sewage backup. Whatever the source, it’s crucial to respond quickly to mitigate damage and prevent further issues.

Water Damage Remediation Salt Lake City involves three key steps: Mitigation, cleaning, and restoration. Let’s look at each one in turn.

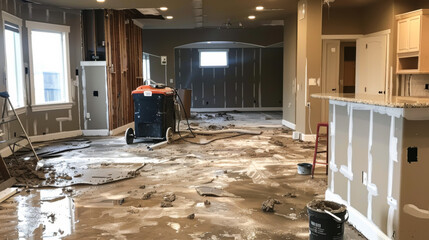
Stage 1: Water Removal

The first step in remediation is to remove any standing water. The water mitigation team will assess the damage and the source of the leak, and they will use pumps and other tools to extract the water. They may also use dehumidifiers to dry up the space, and they will apply antimicrobial solutions to prevent bacteria from growing in the future. Any materials and belongings that can’t be saved will need to be removed from the space and safely disposed of.

Once the water has been extracted, the drying and cleaning process can begin. The mitigation team will use specialized cleaning solutions and sanitizers to thoroughly clean any affected surfaces. The goal is to kill any bacteria and other germs, as well as to remove any odors caused by the flooding. They will also sanitize any fabrics, carpets, or furniture that has been impacted by the water. This will help prevent the growth of mold and mildew, which can cause further damage to your property and lead to health issues for your family or employees.

In some cases, the water may need to be filtered or chemically treated during the remediation process. This is typically done when the water has come from a contaminated source, such as sewage or floodwaters. The filtration or chemical treatment process will reduce the level of contamination to a safe level for drinking and other uses.

The last step in the water remediation process is to sanitize the affected area. This will involve scrubbing and vacuuming the surfaces, as well as disinfecting all materials that have been touched by the floodwaters. The sanitizing process will also include sanitizing any personal belongings that have been affected by the water. Once the sanitizing is complete, the space will be ready for any repairs or rebuilding to begin. This can take weeks or even months, depending on the amount of work needed to get your home or office back to normal. The reconstruction and repair phase of water restoration is what will ultimately get you back to your normal life.

Stage 2: Drying

In this stage, pumps and vacuums are used to remove as much standing water as possible. This helps to reduce the amount of time materials like drywall and insulation are exposed to moisture, which minimizes damage and prevents the onset of mold and mildew. Commercial-grade dehumidifiers and air movers can also be used to help the drying process along.

As the water is removed, professionals can take a more in-depth look at the damage and determine what needs to be done. The inspection allows them to plan for the best course of action to restore your home, which may include using a combination of techniques such as scrubbing hard surfaces, drying carpets, or even replacing them if they are beyond salvageable.

This is important because a lot of water damage isn’t immediately visible and can cause hidden problems that are more expensive to repair, such as mold growth or structural damage. Mold spores are especially dangerous and can thrive in moist environments, which is why it is so important to have all areas of your home dried as quickly as possible.

The drying process can be extended with the use of antibacterial solutions and sanitizing chemicals to ensure no microbial growth occurs after the restoration has been completed. Once everything has been sanitized and thoroughly dried, it is ready for rebuilding, repairs, or replacement to begin.

If the source of the water is contaminated (Category 3 or above), additional sanitation procedures are required before cleaning can begin. This includes wearing PPE such as face masks, rubber gloves, and protective eyewear to avoid any infection or disease. This is because Category 3 water is considered unsanitary and can contain dangerous pathogens.

This is a critical step in the remediation process, as it is the bridge between mitigation and restoration. The clean up and drying process will remove any contaminants, allowing restoration technicians to work more efficiently when they start their repairs. This may include removing and replacing damaged items, installing new appliances, rebuilding walls, and floors, and replacing any drywall or insulation that is damaged.

Stage 3: Cleaning

Once the structural issues have been resolved, the next step in water damage restoration is to clean and sanitize. This step is essential to prevent mold and bacteria growth, which can cause health problems for occupants. The key is to use appropriate cleaners and to dry all surfaces thoroughly. In addition, a thorough inspection of the area is critical to identify any hidden areas where contamination may occur. If necessary, contaminated materials should be removed and safely disposed of.

Depending on the severity of the loss, it is vital to act quickly to minimize long-term problems. This starts with identifying and stopping the source of water intrusion, such as turning off the main water supply or fixing a leaky pipe. A professional water damage restoration company can also assess the extent of the damage and determine if there are any concealed issues, such as hidden leaks in crawlspaces or attics.

After a thorough inspection, the water damage remediation team will determine what materials and belongings can be restored. Items that cannot be saved should be removed and properly disposed of, such as carpeting or drywall. In addition, it is important to check for and repair any underlying problems that can lead to future issues, such as weakened support beams or joists due to water intrusion.

Water restoration companies can use advanced technology to speed up the water extraction and drying process. This includes moisture meters and thermal cameras to accurately evaluate moisture levels and spot potential problems. These tools also improve efficiency by allowing technicians to target specific problem areas faster. In addition, they can monitor drying progress and ensure that all areas are completely dry before moving on to the next stage of the water damage restoration process. It is also important to hire a reputable mitigation firm that has IICRC certification, belongs to industry associations, and maintains all required licenses and insurance policies. This will help to ensure that the company has the proper skills and equipment to handle any size loss. Also, a reputable company will offer a written guarantee to provide peace of mind to their clients.

Stage 4: Repairs

Depending on the extent of water damage, this stage may include structural repairs and reconstruction. Walls, ceilings, floors, and drywall can all suffer damage when exposed to water for extended periods of time. Structural issues, such as warping and buckling, can be costly to repair or replace, but maintaining structural integrity is crucial for safety and maintaining property value.

Structural damage should be assessed by a professional prior to beginning the restoration process. A qualified team will use moisture meters and infrared cameras to map the water intrusion and its impact on structural materials. This helps shape a targeted water damage restoration plan that ensures hidden moisture doesn’t remain trapped behind walls or other surfaces.

A thorough inspection will also help determine what materials can be saved, versus which ones must be replaced. For example, a stud wall might be salvageable, but a drywall or plaster wall is likely to need to be replaced. This assessment and documentation will be important for insurance claims.

Thorough cleaning and sanitizing of affected materials is essential to prevent mold and mildew growth and to sanitize personal belongings that were left in the affected area. Industrial-grade sanitizers can eliminate harmful bacteria and fungi from surface materials. It’s also critical to dry all surfaces thoroughly to inhibit future microbial growth and to protect occupant health.

The best way to mitigate water damage is through prevention and regular maintenance, but if a disaster does occur, prompt mitigation is key to minimize long-term damage and to reduce the cost of restoration services. The five-step water remediation process follows IICRC standards and includes: Immediate Assessment and Inspection – Identifying the source of water, classification, and contamination; Emergency Water Extraction – Deploying pumps and vacuums to remove standing water; Advanced Drying – Utilizing air movers, dehumidifiers, and other tools to control humidity levels and prevent mold and mildew; Cleaning and Sanitizing – Applying antimicrobial treatments and odor neutralizers; and Repairs – Replacing damaged materials or reconstructing structures as needed.

Hidden Costs in Cabinet Refinishing Projects

San Jose Cabinet Refinishing

If your kitchen cabinets are outdated, worn, or damaged but the layout works well for your space, cabinet refinishing is an affordable, smart alternative to full replacement. This process preserves the existing cabinet structure and eliminates costs associated with demolition, waste, and disruption to your daily routine.

However, cabinet refinishing is more than just paint and elbow grease! It involves additional costs that must be understood for precise budgeting and smooth project execution. Contact San Jose Cabinet Refinishing for more details.

Cost of Materials

The cost of materials plays a big role in cabinet refinishing projects, and it is essential to carefully consider the types and quality of products used. Choosing lower-quality materials often leads to disappointing results, including drips, uneven coverage and flaking. Professionals utilize high-quality, durable materials designed to withstand daily kitchen wear and tear for long-lasting results. These premium materials typically cost more than store-bought paint and brushes, but they are well worth the investment in the end for a beautiful, long-lasting finish.

The type of finishing technique also affects price. Staining, for example, offers a natural look that enhances solid wood cabinets. However, it is important to note that staining can not be used on cabinetry that has veneers or other materials. Similarly, glazing is another option for cabinet refinishing, but it requires more extensive prep work than painting.

Refinishing is a great option for homeowners who want to update their cabinets without spending thousands of dollars on a full replacement. The process of refinishing involves sanding down existing surfaces and applying a new coat of paint or stain to revitalize the appearance of your cabinets. It is most effective on cabinets that are made of solid wood and are in good condition, but can also be used to give a makeover to fiberboard or MDF cabinetry.

In addition to the types and quality of materials used, other factors like environmental conditions can affect final results. The amount of humidity in the air, for instance, can impact drying times and lead to inconsistent coloration and blemishes. In addition, unaddressed issues like water damage may require drywall repair before any finishing can occur.

Depending on the size of your kitchen, the type of finish and other project details, you can expect to spend between $1,500 and $5,000 for professional cabinet refinishing. This includes labor costs ranging from $35 to $75 per hour and the use of top-quality materials that will last for years to come. While refinishing is more expensive than simply replacing your existing cabinetry, the added value of a guaranteed result and peace of mind makes it a worthwhile investment for many homeowners.

Cost of Preparation

One of the biggest hidden costs in cabinet refinishing projects is the cost of preparing your cabinets for the work. This includes removing all hardware, thoroughly cleaning and sanding the surfaces of your cabinets, and making any necessary repairs to your cabinets before applying a new finish. This prep work can add up, but it’s a crucial step that ensures a flawless finish that will last long after the initial coat of paint has dried.

Depending on the condition of your cabinetry, you may also need to spend money on things like sanding equipment and protective gear. Additionally, if you’re planning to make major changes to your cabinet layout or add new features, you’ll need to budget for those costs as well.

Another factor to consider is how much time you’re willing to invest in the project. Cabinet refinishing is often done on an hourly basis, and labor rates vary by region. Generally, the cost will be higher if you’re working with a large kitchen or if the job requires special skills or materials.

If your cabinets are in good shape, refinishing is a great option for getting a new look without the expense and hassle of replacing them. It’s also a green choice, as you’ll be using existing materials and reducing waste. However, if your cabinets are in poor condition, it might be better to replace them instead of refinishing them.

While refinishing is less expensive than a full remodel, it’s still important to carefully consider all the costs involved. In addition to the cost of materials and labor, you’ll need to factor in the cost of any upgrades you plan to do at the same time, like installing soft-close hinges or adding crown molding. Adding these upgrades can give your kitchen an even more dramatic update and will add longevity to your cabinetry.

Choosing a professional to handle your cabinet refinishing will ensure that you get the best results and the longest-lasting finish possible. Professionals have specialized tools and training, which allows them to achieve high-quality results that will stand the test of time. They can also help you choose the right color and finish for your cabinetry, which will have a big impact on the final result.

Cost of Labor

When you hire a professional to refinish your cabinets, the biggest chunk of your budget will go to skilled labor. This includes time to sand and prep the surface, repair any damage, apply multiple coats, and achieve the final look you desire.

This work is essential to a beautiful and lasting finish, as well as long-term durability. It also ensures a smooth and even application, which is something that DIY projects can struggle to replicate. A trusted pro can give you a flawless and durable result that is worth the investment, especially when compared to the cost of replacing damaged or outdated cabinetry.

The size of your kitchen and cabinetry also impacts the overall cost. Larger cabinets require more time and material than smaller ones, as well as more complex finishes. Additionally, any custom designs or layouts will require more material and labor to properly fit. The type of finish you choose also impacts pricing: painting typically requires more prep and smoothing than staining, which can increase costs. Additionally, glossier finishes are more expensive than matte or satin options but offer greater durability and ease of cleaning.

It’s also important to consider any additional materials you may need for your refinishing project, including masking tape, gloves, and paint thinner. These items can add up quickly and significantly impact the total project cost. It’s always wise to discuss your plans with a professional before getting started, so they can help you determine what materials will be needed and the exact price tag.

A high-quality cabinet refinishing project can make your home more appealing and increase its value, but it’s essential to understand the hidden costs involved before diving in. By working with a trusted pro, you can avoid costly surprises and get the results you deserve.

By investing in the right materials, a skilled team of professionals, and a thorough estimate, your refinishing project can be a worthwhile upgrade that will last for years to come. To learn more about this smart and affordable option for updating your home, contact us today! We can answer any questions you may have and provide a free estimate.

Cost of Finishing

When it comes to cabinet refacing, price depends on the type of material you choose. High-end materials like solid wood will cost more than low-end options, but both materials will add a sense of durability and luxury to your kitchen. Cabinet hardware can also play a role in your overall project costs. Purchasing new handles and knobs is a common expense, but you may be able to find them at local hardware stores for cheaper.

The choice of finish is another significant factor. Staining is a traditional option that can bring out the natural beauty of solid wood cabinets, but it can also be more expensive than painting. The quality of stain will affect the final cost, as higher-end stains are more durable and less susceptible to water damage and fading.

Refinishing is a much more environmentally-conscious option than replacing your old cabinets, minimizing waste and resource consumption. However, the process will still create some mess in your home, primarily through the use of airborne dust particles. This can be minimized by choosing a professional company that uses advanced technologies, such as N-Hance, which eliminates traditional sanding and significantly reduces airborne dust and debris.

Regardless of the finishing method, it is important to have an accurate estimate of your costs before starting any work. This will help you budget for the work and make smart decisions regarding your material selections, color scheme, and other design elements. It will also help you avoid costly surprises down the road, such as unexpected structural repairs or additional labor to correct mistakes.

Many contractors will offer a free consultation and estimate before beginning the work. During this meeting, you will have the opportunity to discuss your desired look and ask questions about the process and final cost of your project. Be sure to ask about any hidden costs that you may need to plan for, such as demolition, environmental fees, or permits. Additionally, it is important to consider long-term maintenance requirements, such as regular cleaning and refinishing. This will help ensure your finished product lasts longer and maintains its beauty.